Monday, 27 February 2012

Another beaded ring tutorial


Wide Blue Beaded ring

Blue Bead Ring


To make this ring you will need:
Fishing line
24 blue beads
64 pale blue beads
64 white beads

This is quite a simple tutorial, just repetitive.

First start with one white bead and thread it onto the fishing line, making sure that the bead reaches the middle of the line (and ensuring the lengths of fishing line are of equal length on either side of the bead).

Then thread two more white beads onto the line, when you add the fourth bead make sure both ends of the fishing line cross through it to make a loop of four white beads...

Continue threading beads as indicated on the diagram...

I hope the diagram is easy to follow...


Here are a few more instructions which hopefully clear up any questions (the previous set of instructions probably lack a bit of detail!). Right click and save as to get a bigger view of the instructions (I can't seem to enlarge them any more on blogger!


If there are any questions please do not hesitate to put your questions in the comments box below and I will try and get back to you!

Saturday, 25 February 2012

Beaded Ring Tutorial

This post is a tutorial on how to make a ring out of (mostly) 2mm plastic beads. It can be a little fiddly but the tutorial for this is much easier to follow than the mouse ball charm tutorial I posted up a while back.

A ring made out of plastic beads is a nice alternative to metal (especially if you are allergic to metals). Also using fishing line to thread the beads gives the ring some flexibility, but you can use wire if you want the front detailing to lie flatter (rather than rounded).

White and pale blue bead ring

Blue and White bead ring


To make this ring you will need:

Fishing line
2mm beads in white X 42 (depends on how large you want to make the main band of the ring)
2mm beads in blue X 13 (depends on how large you want to make the main band of the ring)
4mm Swarovski beads X 8 

1) All you need to do is use one long one piece of fishing line thread one bead onto it.

2) Let the bead fall about half way down the fishing line, make sure that you have equal lengths of fishing line      on either side of the bead.

3)Then keep threading beads on both ends of the fishing line and make sure that both ends of the fishing line cross through the middle bead.

4) Keep going until you reach the desired band length, use both ends of the fishing line to cross through the first bead you threaded.

Beaded Ring Tutorial Diagram


Bead Rings

Friday, 24 February 2012

Coffee Cup Art

Hangman and Coffee Cups...
Things to do on a train journey.

Know of any other activities to help pass the time on a long journey?

Thursday, 23 February 2012

Can you see what it is yet?


...
...
...
...
...
...
...
...
...
...
...
...
...
...
...
...
...
...
...
...
...
It's Arsene Wenger as a lucky star!


Tuesday, 21 February 2012

Origami Lucky Pirate Stars

Another tutorial, this time on how to make Origami lucky stars! These are really easy to make, all you need is a strip of paper (roughly about 30cm long and 1cm wide).

Jars of lucky stars

Here are the instructions (I got the diagrams from another website http://www.origami-fun.com/origami-lucky-star.html

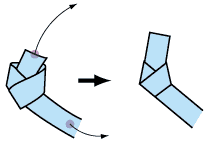
Starting with a strip of paper (30cm long and 1cm wide). Make a 'knot' at one end of the strip of paper.

Once you have made the 'knot', pull gently on both ends of the paper to tighten. (Make sure one end is much shorter than the other). Then flatten.

Fold the short end of the strip down and tuck it into the knot. (If it is too long, cut a bit off).

Now wrap the long end of the strip around and around the pentagon shape you have formed. Gently creasing as you go.

Keep wrapping the strip around until you reach the end. Tuck the last bit of the strip into the pouch and you should be left with a little pentagon.

Now pinch the edges to turn the pentagon into a star.

Finish!


Nearrgh Pirate Stars


Thursday, 16 February 2012

Little Mouse Ball


Hello, this is my first craft post. I thought I would share with you all a little video on how to make a 3d bead keychain/phone charm (its not much of a ‘how to’ video though, it goes by a little too quick to follow!)


The first time I came across 3d beading was on a family holiday to Hong Kong (I think it was in 2004...but I can’t quite remember...) I visited a craft shop by chance with my sister and the lady offered to teach us how to make a dog out of beads (as long as we bought shit loads of beads from her, which we did). She was possibly the most patient lady in the world because my sister and I took absolutely ages to work out how to string it together (even with step by step guidance from her).


Anyway I am going to attempt to post up a diagram which shows how to make this little mouse ball charm. I added a mobile charm string thing to the top of it (so it can be used as a mobile charm, key ring or bag charm). The diagram looks quite confusing and it looks sort of difficult to decipher, but I couldn’t think of any other way of documenting it in a step-by-step way. I originally had this as a diagram given to me from the bead lady but I have adapted it a little.


An easy(ish) way of going about using this diagram is to print it out and cross off each bead on the diagram as you thread it onto the string.